domingo, 20 de septiembre de 2020

ZENTANGLE AUTUMN LEAF


First, it’s helpful to familiarize yourself with all of the elements of art, that's why let's read this poem by M.C. Gillis

The Zentangle Method is an easy-to-learn, relaxing, and fun way to create be images beautiful drawing structured patterns.

Explore this video  to learn more about the benefits and beauty of the Zentangle Method and our nourishing world-wide Zentangle community.


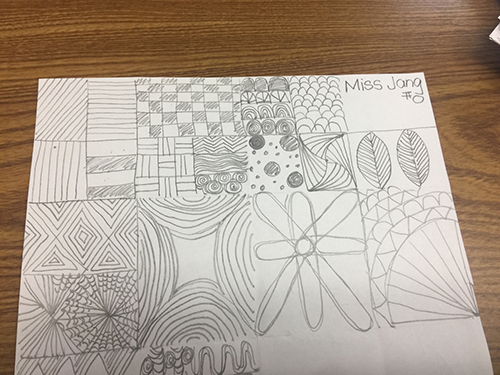
So how do you get started? First, practice different line designs on a plain white paper. We folded the paper into some sections to introduce zigzags, stripes, dots, wave, spirals... After practicing the designs, I let students create some of their own patterns and designs. 

 
And now it's time to create your own Zentangle Autumn Leaf.
Click on this link to download a leaf pdf
https://www.woojr.com/leaf-template-printables/maple-leaf-shape/


domingo, 13 de septiembre de 2020

BEHIND MY MASK, A SUPER KID SELF-PORTRAIT !

 I always seem to start out school year with a selfie so I was bummed when I thought of the idea of my students drawing themselves with their best facial feature hidden. 
And that's where the idea of this surprise drawing came from. Here's a video by Cassie Stephens 
You simply are going to use  paper, permanent marker, coloring markers and crayons
 

 THese can  be the results


Thanks to https://cassiestephens.blogspot.com
 
for this great idea!!!

martes, 26 de mayo de 2020

STILL LIFES


A still life (bodegón en español) is simply a painting or drawing of objects. It is different from other forms of figurative work in the sense that it  can  not move and it is close to you.
There are two forms of still life:
1.-Group of natural objects: food, flowers, fruit, vegetables..


2.-Group of objects made by people: cooking pots, bottles, clothing, musical instrumets...


They were very popular in the 17th century. If we see now, we can know a bit of History in them
Some important artist who created still lifes are

Caravaggio


Paul Cezanne


Henri Matisse


Salvador Dalí


Vicent Van Gogh


Now it's your turn, you have to create your own still life in a photo and then you have to make a slide with two photos, the original and your photo like this and share with me


..

miércoles, 13 de mayo de 2020

RAINBOWS IN OUR WINDOWS


Why are people putting rainbow pictures in their windows?


Rainbow pictures have been placed in windows to cheer up passers by.
These pictures are meant to offer a message of hope to the public during the coronavirus lockdown.
They have primarily been drawn by children urging people to keep positive, with rainbows showing that the sun follows heavy rainfall.


Now it's time to create our rainbows with a positive message to create a big mural at school and think we are going to survive this virus.
Click on this photo and you can create your rainbow like mine
Instructions
1.-Editas el texto de arriba (text 1)
2.-Editas el slogan escribiendo tu nombre (text 2)
3.-En Layout puedes mover el logo
4.-Le añades Background (fondo)
5.-En Shape le puedes poner etiquetas
6.-Cuando lo tengas terminado clicas en SHARE (arriba en barra negra)  y te saldrá una ventana emergente, pinchas con el botón derecho en la imagen y la descargas a tu pc. 
7.-Ahora solo tienes que enviarmela al correo montseseoane@ceipfrianteis.com


Some positive messages could be
Stay at home
Keep calm
Wash your hands
Stay positive
We are together in a  social distance
Good energy is contagious
We can beat it together
Together we fight
Avoid contact with sick people
Everything will be ok
Believe in yourself
Calm down and fight pandemic
Stay home safe
Protect each other
We will win
Stay safe
We can stop Corona


jueves, 30 de abril de 2020

ANIMAL HAND SHADOWS PUPPETS


How many of these hand shadow puppets have you tried making?
You rarely get to see hand shadow puppets in this area of high tech gadgets when entertainment is just a tap on the screen away. But before smartphone, tablets, Netflix and what-not, hand shadow puppets served as a simple form of entertainment earlier.

Let's have a look to this videos


If you want to take a break from your technology, why not to get creative and create some animal shadow puppets?
It's easy and it can be a great way to have some fun with your family.
 Get those fingers and hands working and try some images, then you might use tech to record or take a photo of your figures and tell us the animal or animals you are creating.

 Here , ClipArt, you have some more animal shadows
and here below you can watch my shadow


Now it's your turn.

viernes, 27 de marzo de 2020

SPRING IS HERE !!!

Spring has came and we are at home with the pandemia, but the sun is outside and let's try to create a flower with recycled material you have got at home. Here you have some photos and videos to give you some ideas


jueves, 9 de enero de 2020

OP ART 3D CONE


We introduce pupils to various OP Art by artists Victor Vasarely and Bridget Riley, and learned what Op art was (Optical Illusion Art) with some videos.


Now it's time to start:

Six straight lines that intersect at the same spot, were drawn ahead of time on 80# 10×10″ paper for each student with a ruler; Creating 12 “slices” in total. 


Students then drew a series of concentric curved lines alternating the direction of the curve within each “slice”. 


Once finished with that step, students labeled every OTHER slice with a “B” lightly in pencil, to mark that space as black.


Students then drew a series of concentric curved lines alternating the direction of the curve within each “slice”. 


Once finished with that step, students labeled every OTHER slice with a “B” lightly in pencil, to mark that space as black.

This step helps speed things along as kids color in– (just locate the ones labeled “B”), AND reduces any potential mistakes while using Sharpie. 


Once that’s all set, students then started tracing over the smallest slices labeled “B” in the center, using a extra fine point Sharpie, (so it wouldn’t bleed too much into the small white sections), then filled in. 


Once that’s all set, students then started tracing over the smallest slices labeled “B” in the center, using a extra fine point Sharpie, (so it wouldn’t bleed too much into the small white sections), then filled in. 

As areas got larger, kids switched to a Fine Point Sharpie, (since it has a thicker tip), and colored in the rest.